Saturday, October 5, 2019

Welcome Back

My house has been saying "Welcome Back- we knew you couldn’t resist our good looks.” And how true that was! I had spent a straight year renovating as much as I could, but then life happened. I moved in some roommates, started a business, and switched grade levels. All these things meant much less time to focus on my renovations. However, school breaks tend to lead themselves to projects.

So as Thanksgiving break rolled around, I decided I couldn’t stare at that kitchen as-is any longer... but I wasn’t really sure how I was going to fix it in a cost effective way. I eventually want to blow out the whole kitchen, so whatever I did needed to be something I was going to be ok pulling out in a few months/years. I knew I didn’t want to sand- it is so labor intensive, and who knows how long I’ll be keeping those cabinets. I also knew that in the garage I painted cabinets with latex paint without sanding- they’ve held up well, but aren’t used daily like the kitchen. So I started researching and came across Tasha’s blog: https://www.designertrapped.com/how-to-paint-kitchen-cabinets/
Painting without sanding?! I was sold... I rushed to Amazon and ordered the deglosser and this amazing Milk Paint she talked about.


Now, now- I know what you’re thinking. This 80’s paint job was fantastic. It’s so fun that they didn’t paint the whole cabinet, right?! Don’t worry- the powder room vanity is still in this style, but painted with a lovely turquoise instead of white. 

So, first step in this process was taking off the cabinet doors- making sure to carefully set aside the hardware so it could be reused. I made sure to mark the back of the cabinet doors with a piece of tape so I could label which cabinet it went to. I carefully laid the cabinets out on a painting blanket so that I could degloss them as well. Deglossing was so simple, and took just minutes! I didn’t even have to clear out the cabinets.


After allowing the deglosser to dry, it was time to paint. I was so excited to try out this paint. It went on nice and smoothly- and in just about three hours, the first coat was applied to the cabinet boxes. I allowed it to dry as I watched some Netflix- I wouldn’t get through most of these projects without some Friends and West Wing. I was determined to finish the boxes that night, so I stayed up till 3am to get the second coat on... and it thoroughly covered up the wood grain, and was already looking brighter! Pro tip- wrap your paint tray, roller, and brush in Saran Wrap and put in the freezer overnight- you’ll be ready to go in the morning!


Now since I stayed up working until 3, I was sore and tired. This meant day 2 didn’t commence until much later in the day, and painting the doors took longer because of the crevices and the previous paint job. While the doors dried in between coats, I spray painted the hinges with a brushed nickel (hint- make sure you spray paint the correct side so you don’t have to redo it all). 


Later that night, the doors and boxes were ready to be antiqued. I was so excited to try out this process, and the first door looked great!


However, when I started putting the doors back on, it wasn’t working together. Between the coloring of the countertops and floor, the cabinets just looked dirty. #fail


So the doors came back off and were painted white again before I ran off to Thanksgiving dinner. It was already looking much better! A few coats of poly later, and it was the moment of truth. I remounted the doors with the freshly painted hardware. 

The final product? Much brighter and cleaner. I still hate almost everything about this dark kitchen and can’t wait to rip it all out, but now it’s more bearable. Besides, isn’t the brick over the stove gorgeous?!


Krud Kutter- $11.93
Foam roller and tray- $7.32
General Finishes Milk Paint (Antique White)- 4x$19.99

Total- $99.21... kitchen redo for under $100 ðŸŽ‰

Friday, June 17, 2016

Charm is More than Beauty- Built-ins and Closet

One of the things that I love about the basement are these two little built-in shelving units.  This is the best "before" picture that I have- there is one on the other side of the room too.  I thought that they were so cute, and added a little bit of charm to this older home.


Once I painted the walls, I realized that the wood tones wouldn't work with my color scheme in the basement.  I wanted to stick to grays and whites to make it as bright as possible.  The backing was painted an off white which just looked dirty.  I wanted to use the same white semi gloss that I had used on the bathroom door.  While I was at it, I would redo all the window trim work, and other door in the basement.  Consistency was the goal!


 I got to use what has quickly become one of my favorite tools- my sander!  I pulled all of the shelves out, and a few hours later, they were all sanded and ready to paint.


As you can see, this color wasn't the clean, crisp look I was going for... so my bright white was ready to go!  I taped over the old hardware, because I decided I just wanted to reuse it to save money.  Maybe eventually I'll replace it.

 Two coats later on the shelves and built in, and it already looked so much newer!  I love how they pop against the dark gray.


I hadn't gotten around to painting the closet side wall, so I did that at the same time.  I picked a lighter gray on this wall- it's actually the same color I used in all the upstairs bedroom.  At first, I wasn't sure I loved the dark gray wall, but I think it gives some contrast to the room.


It was also time to paint my brown window trim in the bedroom, and touch up the other trim and doors.  


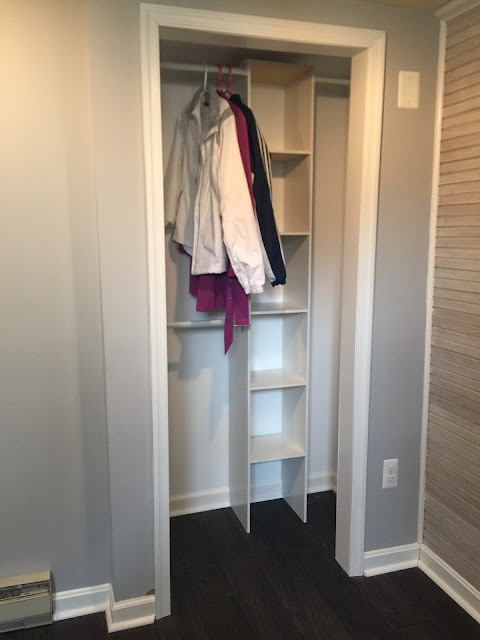
Inside the closet got a brand new coat too!  I paid my bathroom contractor to come back and build out a real closet for the room so that it could be used as a bedroom.  The other closet is a utility closet, and therefore not useful for clothing purposes.  I bought a simple closet organizer I have installed in a previous home, and installed it in the closet.  Though a small closet, it will hopefully be enough storage for whoever wants to move in.  We decided to not do a closet door due to the size of the bedroom.  This way, a bed can be placed with the headboard against the wood wall, and they won't have to worry about having trouble getting in and out of the closet because of a door swinging into the bed.


Almost all set for a renter!

Sunday, June 5, 2016

Flooring is the Foundation of any Beautiful Room- Start with a Great Floor, and the Rest will Fall into Place

No one can forget the beautiful flooring choices that the previous home owner made in the very brown basement...


After a little paint and white washing, the basement was already looking much better!  But the flooring was making it really hard to focus on anything else.


I knew I wanted a gray floor, so I did some research.  I found that it was best to do laminate or vinyl down in the basement due to moisture.  I had decided on a vinyl floor from Floor and Decor, so one day Joe came over with his little helpers to go pick up the floor.


But when we got there, there was a laminate gray that caught my eye.  So now I was stuck and needed to make a decision.  We lined up a few of each board on the ground, and Millie tap danced on both.  She picked the laminate for us, and we liked the beveled edges of it that made it look more like real wood.  We also picked up the moisture barrier as well.  This was the floor that we picked.


When we got home and got everything offloaded from the car, Joe impulsively started ripping up the old floor.  The first few tiles came up super easily, but as everything else in this home has proved to be, it got much more complicated!  We discovered that in some places there was a second layer of flooring, where it was much harder to remove due to the excessive amounts of glue.  I painted the ceilings and swapped out the light bulbs and lens covers on the lights, and it was already looking much brighter!  It was so nice to be able to paint the ceiling, and not have to worry about ruining the floors with paint dripping.


After we got the main floor torn up, it was on to the den.  Joe did this one day while I was at work, and sent me a text to let me know he left me a present in the basement.  This is what I came home to!  Ha!

Clean up was annoying, but I finally got everything up and out of the house- and the garbage crew did just pick it up from the curb (even though their website says you have to schedule a special pick up- I have found they will take anything if you leave it on the curb with the rest of the garbage without an additional fee).  Joe said it was really important to get every last little piece cleaned up so that you wouldn't feel the imperfections underneath the newly laid floor.  So lots of sweeping and vaccuuming!  Once that was done, he started by laying the barrier in the bedroom.  He said it required a lot more cuts than the other room, but that the flooring we picked was some of the easiest he had laid.


He placed spacers in between the wall and the floor to allow for movement... he actually wound up using some flooring samples I had laying around instead of his real spacers!  The bedroom was done in a few hours.  He came over later in the week and was able to knock out the larger room while I was at work- I came home and couldn't believe the difference!  There were still spacers and it needed molding, but it already made a dramatic difference.


It was time for me to get to work on painting the molding and quarter round- pro tip- don't paint on paper drop cloths, or you will be peeling paper off with your fingernails forever!  After this discovery, I used some wire shoe shelves I had laying around to set up the garage as my painting area.


We had to special order the bullnose for the little step up to the bedroom.  This gave the edge a clean, finished look.


After Joe put in the molding, I caulked for what seemed like foreeeeever.  Note the shoes that are off, and the excessive amount of paper towels used for this job!  Don't track that all over your brand new floors!


The room looks great with the new floor all nice and clean, and the new curtains thanks to Tessa!  Look for a blog on how I updated my fabulous built-ins and lighting.