Once the basement bath was underway, Joe was over helping me out with some little projects, and said something about how bad the floor in the upstairs bath was. Since it wasn't a bathroom that I used very often, I kept trying to close the door and ignore it. But as I was showing the bath to rent the room upstairs, I was more and more bothered by it each time. So, over winter break, as my house was already in shambles from my wall paper stripping/painting and the basement renovations, I kept staring at the floor. It probably wasn't as horrible as I made it out to be, but around the toilet, you can see that they used a different peel and stick tile, which made me assume that they had some issues with the toilet leaking at some point.

On New Year's Eve, I got brave and started to peel up the corner of one of the tiles behind the toilet- I figured if I messed it up, I could just put a trash can on top of it :P I wanted to see how easy the tiles would be to get up- this one peeled up a little bit, and then snapped in half! Well, I guess I made the impulsive decision to do the floor. Luckily I had a lot of leftover tile from the basement bath, so at least I wouldn't have to buy that. With the THIRTEEN different types of floors in my home, I knew I wanted to do all the bathrooms with the same floor tile for more consistency. And at this point, I figured, that tile came up pretty easy, this would be a piece of cake.


I was wrong.... that tile was the only part of that floor that was easy to demo. After my ever faithful Youtube search, I removed the toilet (another very difficult task for a party of one, and quite possibly the grossest thing I have dealt with in this home- read further to find another nasty thing I came across in this bathroom), and threw it in the tub. It was so heavy, there was no way I was going to get it down the stairs to the curb by myself. I then shoved a cloth I would never use again into the sewer drain to keep the fumes from getting into the home. Then I went to work on the black vinyl. After it took me an hour to just get up one tile, I stopped and did some more research. There was such a ridiculous amount of adhesive used! I found some tips that said to try a hair dryer or a wallpaper steamer- since I just got the steamer, I decided to give that a try- and it worked soooo much better. But, I was still left with lots of stickiness, and another fun surprise- another tile floor underneath!


The vanity remained through this process because I could not get the plumbing disconnected. I kept trying to salvage the P trap, but it was so badly corroded, that I just didn't even feel like dealing with it. The next layer was tonssss of fun. I couldn't figure out what it was made of because it looked like linoleum, but was hard as a rock, almost felt like a really thin ceramic tile. As I kept slowly chipping away at it, my dad calls and says, "I hope it's not asbestos tile." I must have spent hours googling asbestos, trying to figure out if I was going to die. As a last ditch effort, as I kept thinking about how I had totally destroyed my bathroom, I decided to try the steamer on this layer- and believe it or not, it started to come up easier! Only to reveal another layer...


This layer made me do a double take. I wasn't sure if this was a different kind of subfloor, or something else. I took a peek under at the threshold, and could see the subfloor was beneath it. I realized that I had to get the vanity out if I was going to go any further- it was installed on top of these layers. I finally just decided to saw the pipes and rip it out of the wall- that I would just replace the drain pipes. It is here that I discovered another surprise- this was the other super gross task. This is what I found underneath the vanity when I ripped it out- dirty men's underwear, magazines, and tampon applicators. For real?! There must have been a leak at some point, and this was their solution.

Once I got the vanity out, the wood layer was pretty easy to pull up with a crowbar. Then I could see the subfloor which was badly stained. I had Joe take a look at it for mold and other bad damage, and he said that it was in good shape, just stained, not crumbling. So real quickly, I ripped out the chair rail, used some joint compound to repair, and then painted the room. This way I wouldn't have to be painting once the new floors were down.


I couldn't reach the skylight area, so it's remaining the old color for now. Most of the time there is enough sunlight coming through the window that you don't even notice- eventually I'll have to get someone in to repaint it.

We went and picked up some Wonderboard. We got this laid pretty quickly and easily, and let it set overnight.

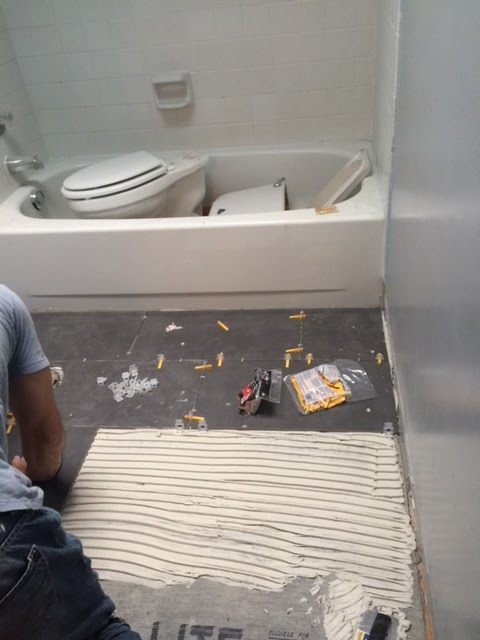
Then we got to work on measuring and laying the tiles out. We did this before we laid the thin set. I had gotten a cheap wet saw off amazon, which required some extra effort on Joe's part to cut, but it turned out great! And check out his awesome work outfit.


Once all the tile was cut, it was time to start laying it for real. This part was a little scary because those air pockets create such a super amount of suctioning, that it was super tough to get them back up if they were just slightly misplaced. I learned about the leveling clips, and how and where to place them. The tile went down pretty quick until right at the doorway. The pieces closest to the door were smaller, and one cracked- so we called it quits and Joe fixed it the next day.


After the clips were removed, the tiles looked great! A million times better. I had a vanity picked out, but happened to be on Craigslist one day in the middle of renovations, and came across this awesome dresser for only $65. After a fail on getting a custom dresser vanity made for the basement bath, I got really set on trying to use this for the bath. It sat in my entryway for months while I figured out what to do with it!

Next up was the toilet. After carefully reviewing the directions, we began the task of installing the toilet. The wax ring is still sooo gross!


Checking that the toilet is level. This is something I would have never thought to do. We did have to use a few toilet shims.


Now, the vanity wound up being a bigger obstacle than I had hoped, but the final product turned out great! We did cause some water damage in the dining room, and needed to call a plumber, but Joe did a great job of setting the sink and plumbing. I love that we were able to save the top drawer for storage. The bottom two drawers are now hinged with shelves. The vanity and shower curtain add just the perfect amount of color! And I love how high the bowl sits on the dresser.


